作者:阿风
审阅者:HugoXie 、 allen
序言 相信很多人面试的时候被问到过 Android 中的数据持久化,其中有一个方法就是使用 SharedPreferences 来保存一些简单的数据到本地。如果你对 SharedPreferences 还不了解,建议先阅读官方文档,再写个小 demo 实践一下。
SharedPreferences 用的比较多的同学可能知道,在 API9 以后加入了一个新的方法 apply() ,官方文档中可以看到在不关心返回值的情况下尽量使用 apply() 。另外 SharedPreferences 对于多进程的数据分享会出现不同步的情况,推荐阅读多进程中安全的使用SharedPreferences 。以上的问题是为什么呢?作为一个时刻保持好奇心的码农,今天就来学习一下 SharedPreferences 的源码。
源码解析 本篇文章的解析思路主要是 SharedPreferences 的工作流程,重点分析 commit() 和apply() 的区别。
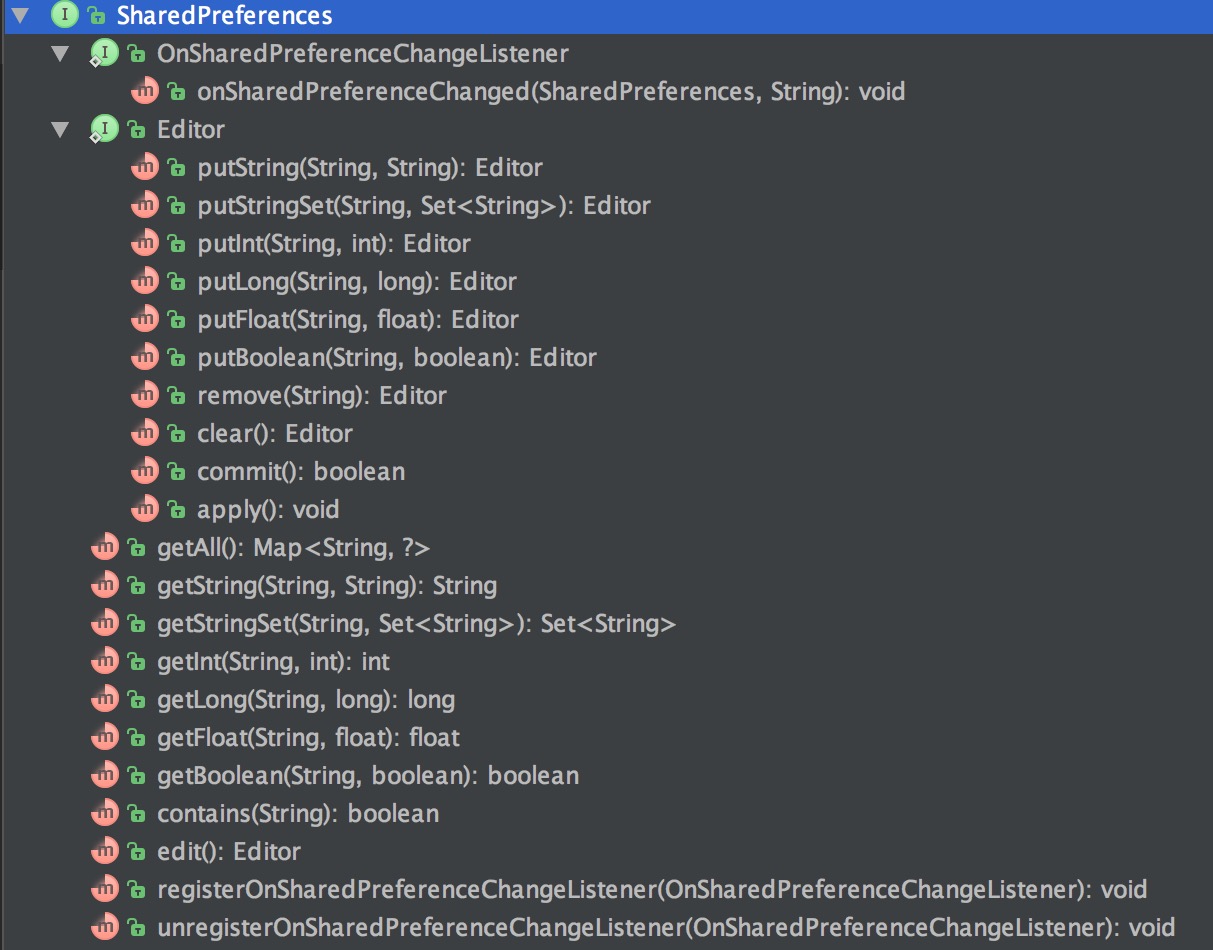
SharedPreferences (以下简称 SP)是一个接口,贴一张图来看看他的结构:
可以看到这个接口的结构本身不复杂,所有对数据进行改动的操作都在 Editor 接口内,另外还有一个 SP 操作的监听接口,好了,接下来就看看他的实现类 - SharedPreferencesImpl (以下简称 SPI)。
初始化 private final File mFile;
private final File mBackupFile;
private final int mMode;
private Map<String, Object> mMap;
private int mDiskWritesInFlight = 0 ;
private boolean mLoaded = false ;
private long mStatTimestamp;
private long mStatSize;
private final Object mWritingToDiskLock = new Object();
private static final Object mContent = new Object();
private final WeakHashMap<OnSharedPreferenceChangeListener, Object> mListeners =
new WeakHashMap<OnSharedPreferenceChangeListener, Object>();
SharedPreferencesImpl(File file, int mode) {
mFile = file;
mBackupFile = makeBackupFile(file);
mMode = mode;
mLoaded = false ;
mMap = null ;
startLoadFromDisk();
}
private static File makeBackupFile (File prefsFile)
return new File(prefsFile.getPath() + ".bak" );
}
构造方法中初始化了一些成员变量,首先是保存数据用的文件,熟悉 SP 的同学应该都知道这是个 xml 文件,事实上是在 Context 中指定的,后面会讲到。接着就是初始化了一个备份文件,当数据写入失败时用于恢复数据,后面也会讲到。另外就是文件的访问权限,还初始化了一个 Map ,先来看看 startLoadFromDisk() 方法,代码比较长,省略了一些异常捕获的代码。
private void startLoadFromDisk ()
synchronized (this ) {
mLoaded = false ;
}
new Thread("SharedPreferencesImpl-load" ) {
public void run ()
synchronized (SharedPreferencesImpl.this ) {
loadFromDiskLocked();
}
}
}.start();
}
private void loadFromDiskLocked ()
if (mLoaded) {
return ;
}
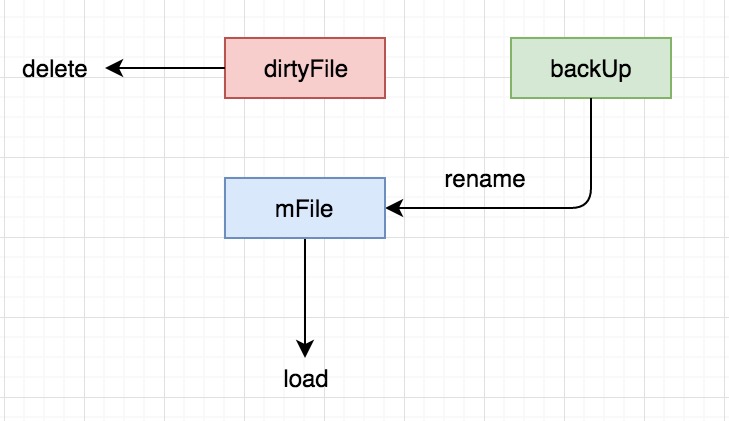
if (mBackupFile.exists()) {
mFile.delete();
mBackupFile.renameTo(mFile);
}
... 省略 ...
Map map = null ;
StructStat stat = null ;
try {
stat = Os.stat(mFile.getPath());
if (mFile.canRead()) {
BufferedInputStream str = null ;
try {
str = new BufferedInputStream(
new FileInputStream(mFile), 16 *1024 );
map = XmlUtils.readMapXml(str);
} catch (XmlPullParserException e) {
... 省略 ...
} finally {
IoUtils.closeQuietly(str);
}
}
} catch (ErrnoException e) {
}
mLoaded = true ;
if (map != null ) {
mMap = map;
mStatTimestamp = stat.st_mtime;
mStatSize = stat.st_size;
} else {
mMap = new HashMap<String, Object>();
}
notifyAll();
}
这段代码看起来特别长,其实就做了一件事情,将 xml 文件解析后以键值对的形式存放到一个 Map 中,初始化也就算结束了。
读数据 想必你也猜到了,读取数据就是从 mMap 中去获取,比较简单:
public String getString (String key, @Nullable String defValue)
synchronized (this ) {
awaitLoadedLocked();
String v = (String)mMap.get(key);
return v != null ? v : defValue;
}
}
写数据 写数据是 Editor 对象去操作的,首先获取一个 Editor,这里 Google 工程师还留下了一个 TODO :
public Editor edit ()
synchronized (this ) {
awaitLoadedLocked();
}
return new EditorImpl();
}
来看看链式调用的第一步,putString():
public Editor putString (String key, @Nullable String value)
private final Map<String, Object> mModified = Maps.newHashMap();
synchronized (this ) {
mModified.put(key, value);
return this ;
}
}
Editor 中有一个 Map ,看名字是保存被修改的数据。
接下来就是本文分析的重头戏了,提交修改有两个方法 commit() 和 apply(),先来看看官方文档中对于 apply 的描述
Unlike commit(), which writes its preferences out to persistent storage synchronously, apply() commits its changes to the in-memory SharedPreferences immediately but starts an asynchronous commit to disk and you won’t be notified of any failures. If another editor on this SharedPreferences does a regular commit() while a apply() is still outstanding, the commit() will block until all async commits are completed as well as the commit itself.
大意是 commit 写数据是同步操作(先这么理解,细节上并不是简单的同步),有返回值,而 apply() 是异步操作没有返回值。那我们先来看 commit()
commit() public boolean commit ()
MemoryCommitResult mcr = commitToMemory();
SharedPreferencesImpl.this .enqueueDiskWrite(
mcr, null );
try {
mcr.writtenToDiskLatch.await();
} catch (InterruptedException e) {
return false ;
}
notifyListeners(mcr);
return mcr.writeToDiskResult;
}
这段代码很短,但是比较难懂,首先来看一下第一步 commitToMemory() 中代码:
private MemoryCommitResult commitToMemory ()
MemoryCommitResult mcr = new MemoryCommitResult();
synchronized (SharedPreferencesImpl.this ) {
if (mDiskWritesInFlight > 0 ) {
mMap = new HashMap<String, Object>(mMap);
}
mcr.mapToWriteToDisk = mMap;
mDiskWritesInFlight++;
... listener 处理 略 ...
synchronized (this ) {
if (mClear) {
if (!mMap.isEmpty()) {
mcr.changesMade = true ;
mMap.clear();
}
mClear = false ;
}
for (Map.Entry<String, Object> e : mModified.entrySet()) {
String k = e.getKey();
Object v = e.getValue();
if (v == this || v == null ) {
if (!mMap.containsKey(k)) {
continue ;
}
mMap.remove(k);
} else {
if (mMap.containsKey(k)) {
Object existingValue = mMap.get(k);
if (existingValue != null && existingValue.equals(v)) {
continue ;
}
}
mMap.put(k, v);
}
mcr.changesMade = true ;
if (hasListeners) {
mcr.keysModified.add(k);
}
}
mModified.clear();
}
}
return mcr;
}
简单来说,提交到内存的这一步,就是将一开始 Editor 放入到临时修改的 Map 中的数据放入到 SP 的 mMap 中去,然后返回一个 mcr 对象用于标示这次提交结果。
接下来就是第二步写入文件中 enqueueDiskWrite(mcr, null ):
private void enqueueDiskWrite (final MemoryCommitResult mcr,
final Runnable postWriteRunnable) {
final Runnable writeToDiskRunnable = new Runnable() {
public void run ()
synchronized (mWritingToDiskLock) {
writeToFile(mcr);
}
synchronized (SharedPreferencesImpl.this ) {
mDiskWritesInFlight--;
}
if (postWriteRunnable != null ) {
postWriteRunnable.run();
}
}
};
final boolean isFromSyncCommit = (postWriteRunnable == null );
if (isFromSyncCommit) {
boolean wasEmpty = false ;
synchronized (SharedPreferencesImpl.this ) {
wasEmpty = mDiskWritesInFlight == 1 ;
}
if (wasEmpty) {
writeToDiskRunnable.run();
return ;
}
}
QueuedWork.singleThreadExecutor().execute(writeToDiskRunnable);
}
再回去看 commit() 代码调用该方法时第二个参数确实是传的 null,也就是会走同步提交的逻辑,好像解释了 commit() 同步写数据的原因,但是,等等!如果当前写文件的任务有多个呢?发现还是会加入到线程池里面啊,这不就异步了么?!
ps.如果你对线程池的原理感兴趣的话可以看看我这篇文章:ThreadPoolExecutor源码学习笔记 。
没错,当有多个进行中的写任务时,commit() 确实会异步提交,但是!commit()会等待异步执行完毕。
mcr.writtenToDiskLatch.await();
还记得这行代码么?CountDownLatch 的 await() 方法有什么作用?其实我一开始也不知道,看注释吧:
Causes the current thread to wait until the latch has counted down to* zero, unless the thread is {@linkplain Thread#interrupt interrupted}.
会阻塞当前线程,直到 count 到 0,可以看到 mcr 中的 CountDownLatch 的 count 为 1。
那么是在什么时候被唤醒的呢?writeToFile(mcr) ,这个方法也是写入文件的核心逻辑,信息量有点大,慢慢的看,试着理解,后面会给出一张图:
private void writeToFile (MemoryCommitResult mcr)
if (mFile.exists()) {
if (!mcr.changesMade) {
mcr.setDiskWriteResult(true );
return ;
}
if (!mBackupFile.exists()) {
if (!mFile.renameTo(mBackupFile)) {
Log.e(TAG, "Couldn't rename file " + mFile
+ " to backup file " + mBackupFile);
mcr.setDiskWriteResult(false );
return ;
}
} else {
mFile.delete();
}
}
try {
FileOutputStream str = createFileOutputStream(mFile);
if (str == null ) {
mcr.setDiskWriteResult(false );
return ;
}
XmlUtils.writeMapXml(mcr.mapToWriteToDisk, str);
FileUtils.sync(str);
str.close();
ContextImpl.setFilePermissionsFromMode(mFile.getPath(), mMode, 0 );
try {
final StructStat stat = Os.stat(mFile.getPath());
synchronized (this ) {
mStatTimestamp = stat.st_mtime;
mStatSize = stat.st_size;
}
} catch (ErrnoException e) {
}
mBackupFile.delete();
mcr.setDiskWriteResult(true );
return ;
} catch (XmlPullParserException e) {
Log.w(TAG, "writeToFile: Got exception:" , e);
} catch (IOException e) {
Log.w(TAG, "writeToFile: Got exception:" , e);
}
if (mFile.exists()) {
if (!mFile.delete()) {
Log.e(TAG, "Couldn't clean up partially-written file " + mFile);
}
}
mcr.setDiskWriteResult(false );
}
public void setDiskWriteResult (boolean result)
writeToDiskResult = result;
writtenToDiskLatch.countDown();
}
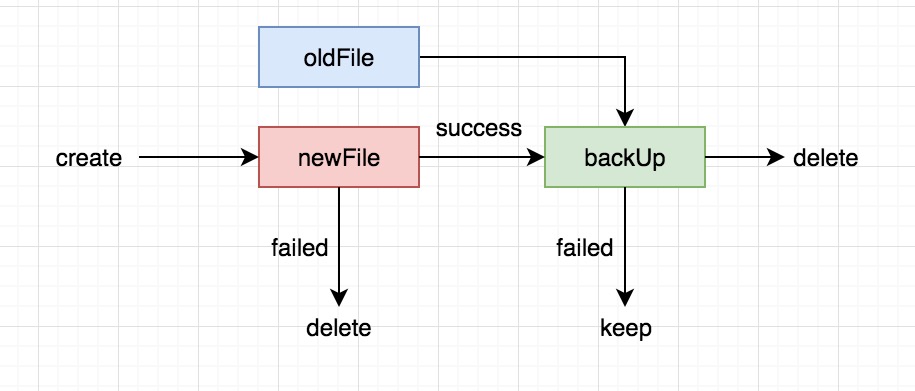
整个写文件的过程就到此结束了,上面的代码中比较难理解的就是备份这个过程,首先要理解的是,在正常的情况下磁盘上只应该有一个文件,正常数据文件或者备份文件。
来看几个图帮助理解。
首先会把旧的文件作为备份(重命名为 .bak),然后创建一个新的文件来写数据,如果成功就删除备份,如果失败就删除新文件,保留备份文件
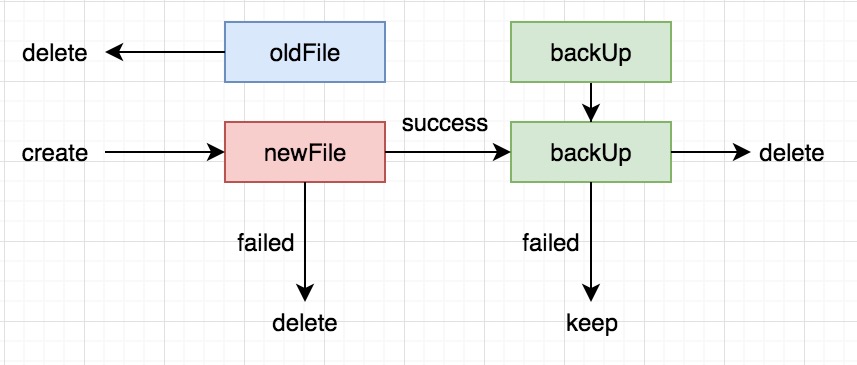
这种情况下会直接把旧文件干掉,其他流程同上。
有没有发现还有一种情况?
写文件成功,删除备份失败,第二次加载文件的时候会出现什么情况?
apply() 分析 commit() 的时候基本已经把写数据的核心逻辑理出来了
public void apply ()
final MemoryCommitResult mcr = commitToMemory();
final Runnable awaitCommit = new Runnable() {
public void run ()
try {
mcr.writtenToDiskLatch.await();
} catch (InterruptedException ignored) {
}
}
};
QueuedWork.add(awaitCommit);
Runnable postWriteRunnable = new Runnable() {
public void run ()
awaitCommit.run();
QueuedWork.remove(awaitCommit);
}
};
SharedPreferencesImpl.this .enqueueDiskWrite(mcr, postWriteRunnable);
notifyListeners(mcr);
}
apply() 在调用 enqueueDiskWrite() 时传入了第二个参数,会加入到线程池中异步处理,且没有返回值
监听 可能很多人都不知道,SP 是有一个监听接口的,在文章最开头的结构图里面也能看到
OnSharedPreferenceChangeListener,知道有监听没什么用,重要的是知道什么时候会回调,这个 listener 只有一个方法
void onSharedPreferenceChanged (SharedPreferences sharedPreferences, String key)
Called when a shared preference is changed, added, or removed. This may be called even if a preference is set to its existing value.
This callback will be run on your main thread.
这个回调会在主线程中,来看代码:
private void notifyListeners (final MemoryCommitResult mcr)
if (mcr.listeners == null || mcr.keysModified == null ||
mcr.keysModified.size() == 0 ) {
return ;
}
if (Looper.myLooper() == Looper.getMainLooper()) {
for (int i = mcr.keysModified.size() - 1 ; i >= 0 ; i--) {
final String key = mcr.keysModified.get(i);
for (OnSharedPreferenceChangeListener listener : mcr.listeners) {
if (listener != null ) {
listener.onSharedPreferenceChanged(SharedPreferencesImpl.this , key);
}
}
}
} else {
ActivityThread.sMainThreadHandler.post(new Runnable() {
public void run ()
notifyListeners(mcr);
}
});
}
}
返回去看 commit() 和 apply() 可以看到最后调用了这个方法。注册和取消监听的方法是
public void registerOnSharedPreferenceChangeListener (OnSharedPreferenceChangeListener listener)
synchronized (this ) {
mListeners.put(listener, mContent);
}
}
public void unregisterOnSharedPreferenceChangeListener (OnSharedPreferenceChangeListener listener)
synchronized (this ) {
mListeners.remove(listener);
}
}
注意每一个被修改的 key 都会以回调的方式依次被传递给监听者
getSharedPreferences() 看完了 SP 中的代码,还有件事情没搞清楚,SP 是被谁创建的?又是怎么管理的?在 Context 中有一个方法 getSharedPreferences(String name, int mode) ,这是个抽象方法,在 ContextImpl 中实现:
* Map from package name, to preference name, to cached preferences.
*/
private static ArrayMap<String, ArrayMap<String, SharedPreferencesImpl>> sSharedPrefs;
@Override
public SharedPreferences getSharedPreferences (String name, int mode)
SharedPreferencesImpl sp;
synchronized (ContextImpl.class) {
if (sSharedPrefs == null ) {
sSharedPrefs =
new ArrayMap<String, ArrayMap<String, SharedPreferencesImpl>>();
}
final String packageName = getPackageName();
ArrayMap<String, SharedPreferencesImpl> packagePrefs = sSharedPrefs.get(packageName);
if (packagePrefs == null ) {
packagePrefs = new ArrayMap<String, SharedPreferencesImpl>();
sSharedPrefs.put(packageName, packagePrefs);
}
if (mPackageInfo.getApplicationInfo().targetSdkVersion <
Build.VERSION_CODES.KITKAT) {
if (name == null ) {
name = "null" ;
}
}
sp = packagePrefs.get(name);
if (sp == null ) {
File prefsFile = getSharedPrefsFile(name);
sp = new SharedPreferencesImpl(prefsFile, mode);
packagePrefs.put(name, sp);
return sp;
}
}
if ((mode & Context.MODE_MULTI_PROCESS) != 0 ||
getApplicationInfo().targetSdkVersion < android.os.Build.VERSION_CODES.HONEYCOMB) {
sp.startReloadIfChangedUnexpectedly();
}
return sp;
}
@Override
public File getSharedPrefsFile (String name)
return makeFilename(getPreferencesDir(), name + ".xml" );
}
总结 分析完了 SP ,多少还是总结一下,其实官方文档已经写得很清楚了
commit() 是同步提交到内存后再同步提交到磁盘上,如果 commit() 之前还有没结束的异步任务(包括 apply() 的提交),就会一直阻塞到前面的提交都完成,才进行提交。apply() 是立即提交到内存后异步提交到磁盘上。commit() 有返回值,而 apply 没有返回值。存在内存与磁盘数据不同步的情况,多进程共享需要注意数据安全。
SP 是可以注册监听的。
大部分同学可能都知道 SP 是基于 xml 进行读写的,自然会担心并发读写的效率问题,事实上通过源码分析可以发现,用 HashMap 作为内存缓存,而 HashMap 的读和写操作效率是非常高的,所以也不应该有 sp 读写耗时的担忧 — allen
最后感谢小刚和三弟的认真审阅和建设性意见。