转载请附原文链接: Volley 源码学习笔记
这几天开启了疯狂的源码学习模式,今天学习的是网络框架 — Volley。依旧按照一贯的思路,从用法入手,再全面分析。
其实把 Volley 理解成为一个 Request (请求)的调度器可能更容易学习。
本次分析主要涉及到的类:
- Volley — 获取队列的帮助类
- RequestQueue — 请求队列,维护请求调度
- NetWorkDispatcher — 网络请求线程
- CacheDispatcher — 缓存线程
- Request — 请求
流程图
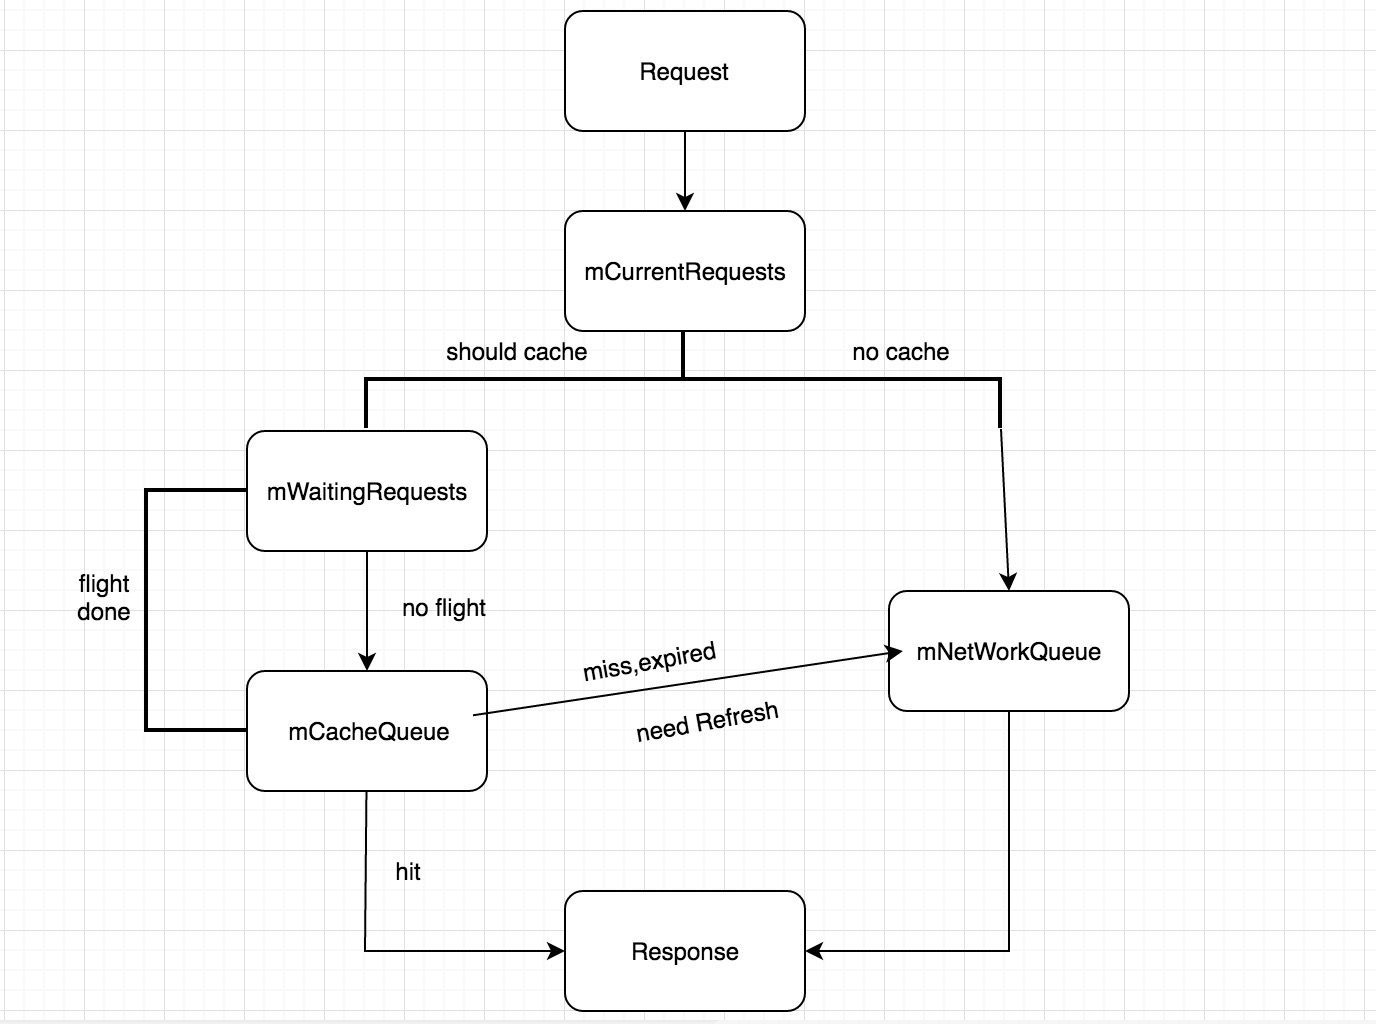
上面是一张 Volley 处理请求的流程图,简单介绍一下有一个大体的认识,再看源码的时候理解起来会相对容易很多。从上到下依次介绍
- 首先会把这个请求加入到一个当前请求的队列中,在这个队列中的请求都表示被 Volley 处理过。在后面结束或者取消请求的时候需要用到
- 接着判断是否需要缓存,需要走左边,不需要走右边直接加入 网络请求队列中
- 左边是一个等待队列,用于判断当前是否有相同的请求正在进行,如果有则相同的请求都放到这个等待队列中不马上执行。如果没有则向下放到缓存队列中,同时在等待队列中标记该请求
- 如果请求被加入到等待队列中了,当正在进行的那个请求被执行完毕后,会将等待队列中重复的请求都放到缓存队列中,也就是直接使用缓存数据而不请求网络了。
这是大致的流程,实际上的处理还有很多小细节,后面几节慢慢的来学习。
创建 RequestQueue
用过 Volley 的同学都知道,使用前应该先获取一个请求队列,然后创建请求,再把请求加入到队列当中去。一般在 Android 中会获取一个全局单例的队列,便于对请求的统一管理。首先来看获取队列的代码。
RequestQueue mRequestQueue = Volley.newRequestQueue(this);
|
来看看 Volley 是怎么创建请求队列的,上面的这个方法调用下面这个方法,传入一个空的 HttpStack。
public static RequestQueue newRequestQueue(Context context, HttpStack stack) { File cacheDir = new File(context.getCacheDir(), DEFAULT_CACHE_DIR); String userAgent = "volley/0"; try { String packageName = context.getPackageName(); PackageInfo info = context.getPackageManager().getPackageInfo(packageName, 0); userAgent = packageName + "/" + info.versionCode; } catch (NameNotFoundException e) { } if (stack == null) { if (Build.VERSION.SDK_INT >= 9) { stack = new HurlStack(); } else { stack = new HttpClientStack(AndroidHttpClient.newInstance(userAgent)); } } Network network = new BasicNetwork(stack); RequestQueue queue = new RequestQueue(new DiskBasedCache(cacheDir), network); queue.start(); return queue; }
|
上面的代码就是创建了一个 RequestQueue 对象,指定了缓存策略和网络请求处理。这里要插一句,为什么区分了一下 SDK 的版本呢?
HttpUrlConnection 和 HttpClient 的区别
HttpClient 是一个网络框架,封装得较为完善,提供了大量的 API 给调用者,性能上也比较稳定。但是这也导致 HttpClient 在保持兼容的情况下扩展性并不是很好,官方也没有很积极的去维护。甚至在 6.0 上将这个框架给废弃。
相反 HttpUrlConnection 就是一个十分轻量的框架,使用上虽然麻烦一点,扩展性很强。但是在 API9 以前这个框架的 bug 很多,表现不稳定。因此在 API9 以前 Volley 是使用的 HttpClient。
在 API9 以后,HttpUrlConnection 修复了许多 bug,并且支持响应压缩 gzip,甚至在 4.0 上提供了缓存机制。因此在 API9 以上 Volley 是使用的 HttpUrlConnection
RequestQueue 构造方法
RequestQueue 创建的时候初始化了几个变量。可以看到默认的网络线程数是四个,而 mDisPatchers 则是一个长度为线程数的数组,而默认的 ExecutorDelivery 是传入了一个主线程的 Handler 。
private static final int DEFAULT_NETWORK_THREAD_POOL_SIZE = 4; public RequestQueue(Cache cache, Network network) { this(cache, network, DEFAULT_NETWORK_THREAD_POOL_SIZE); } public RequestQueue(Cache cache, Network network, int threadPoolSize) { this(cache, network, threadPoolSize, new ExecutorDelivery(new Handler(Looper.getMainLooper()))); } public RequestQueue(Cache cache, Network network, int threadPoolSize, ResponseDelivery delivery) { mCache = cache; mNetwork = network; mDispatchers = new NetworkDispatcher[threadPoolSize]; mDelivery = delivery; }
|
构造方法中看不出什么特别的端倪,接着看 start() 方法
start()
在 start() 方法里面首先确保将所有的调度器都被停止了。
public void start() { stop(); mCacheDispatcher = new CacheDispatcher(mCacheQueue, mNetworkQueue, mCache, mDelivery); mCacheDispatcher.start(); for (int i = 0; i < mDispatchers.length; i++) { NetworkDispatcher networkDispatcher = new NetworkDispatcher(mNetworkQueue, mNetwork, mCache, mDelivery); mDispatchers[i] = networkDispatcher; networkDispatcher.start(); } }
|
这段代码没多少东西,开启了一个缓存调度器,和四个(默认)网络调度器。还是没有什么头绪,先别急着去看调度器里面的代码,咱们先看看请求是如何加入到队列中去的。
请求入队
这段代码比较长,代码用注释来分析。事实上作者的注释也写得十分详尽
public <T> Request<T> add(Request<T> request) { request.setRequestQueue(this); synchronized (mCurrentRequests) { mCurrentRequests.add(request); } request.setSequence(getSequenceNumber()); request.addMarker("add-to-queue"); if (!request.shouldCache()) { mNetworkQueue.add(request); return request; } synchronized (mWaitingRequests) { String cacheKey = request.getCacheKey(); if (mWaitingRequests.containsKey(cacheKey)) { Queue<Request<?>> stagedRequests = mWaitingRequests.get(cacheKey); if (stagedRequests == null) { stagedRequests = new LinkedList<Request<?>>(); } stagedRequests.add(request); mWaitingRequests.put(cacheKey, stagedRequests); if (VolleyLog.DEBUG) { VolleyLog.v("Request for cacheKey=%s is in flight, putting on hold.", cacheKey); } } else { mWaitingRequests.put(cacheKey, null); mCacheQueue.add(request); } return request; } }
|
注意这几件事情
- 只要进入到了 add () 方法中的 Request 就表示被处理过的,都要放到 当前请求的集合中,这个集合中就是目前整个队列中存在的请求
- 如果不需要缓存,则请求都应该请求网络,因此放到网络请求的队列中
- 暂存集合中只要能找到相同的 key 则说明有相同的请求正在等待执行,即便通过 key 获取的值是空
- 重复的请求需要待在暂存集合中,并不会马上被加入到队列中
来看看网络队列和缓存队列是什么鬼,发现两个都是优先阻塞队列,这个后面会讲到。
private final PriorityBlockingQueue<Request<?>> mCacheQueue = new PriorityBlockingQueue<Request<?>>(); private final PriorityBlockingQueue<Request<?>> mNetworkQueue = new PriorityBlockingQueue<Request<?>>();
|
到这里好像请求就添加完成了,那么请求是怎么被处理的呢?
CacheDispatcher 缓存调度
如果有缓存的情况下,请求被加入到了缓存队列中,那就先来看看缓存调度器是怎么工作的。
CacheDispatcher 继承自 Thread 类,复写了 run() 方法。先看看构造方法,在请求队列 start() 方法中把缓存队列,网络队列,缓存策略,以及发送器都传了进来。
public CacheDispatcher(BlockingQueue<Request<?>> cacheQueue,BlockingQueue<Request<?>> networkQueue,Cache cache, ResponseDelivery delivery) { mCacheQueue = cacheQueue; mNetworkQueue = networkQueue; mCache = cache; mDelivery = delivery; }
|
接下来就是 run() 方法,这段代码比较长,但是逻辑上十分清晰,作者的注释不得不说,写的真是非常详尽。
@Override public void run() { if (DEBUG) VolleyLog.v("start new dispatcher"); Process.setThreadPriority(Process.THREAD_PRIORITY_BACKGROUND); mCache.initialize(); while (true) { try { final Request<?> request = mCacheQueue.take(); request.addMarker("cache-queue-take"); if (request.isCanceled()) { request.finish("cache-discard-canceled"); continue; } Cache.Entry entry = mCache.get(request.getCacheKey()); if (entry == null) { request.addMarker("cache-miss"); mNetworkQueue.put(request); continue; } if (entry.isExpired()) { request.addMarker("cache-hit-expired"); request.setCacheEntry(entry); mNetworkQueue.put(request); continue; } request.addMarker("cache-hit"); Response<?> response = request.parseNetworkResponse( new NetworkResponse(entry.data, entry.responseHeaders)); request.addMarker("cache-hit-parsed"); if (!entry.refreshNeeded()) { mDelivery.postResponse(request, response); } else { request.addMarker("cache-hit-refresh-needed"); request.setCacheEntry(entry); response.intermediate = true; mDelivery.postResponse(request, response, new Runnable() { @Override public void run() { try { mNetworkQueue.put(request); } catch (InterruptedException e) { } } }); } } catch (InterruptedException e) { if (mQuit) { return; } continue; } } }
|
总结一下缓存调度器的四种状态
- miss — 失败,请求网络
- expire — 过期,请求网络
- hit — 成功,分发数据
- needRefresh — 成功并需要更新,先分发数据,再请求网络
NetworkDispatcher 网络调度
NetWorkDispatcher 同样继承自 Thread 类,重写了 run() 方法。因为在这里不需要关心缓存,所以构造方法中不需要传入缓存队列
public NetworkDispatcher(BlockingQueue<Request<?>> queue,Network network, Cache cache,ResponseDelivery delivery) { mQueue = queue; mNetwork = network; mCache = cache; mDelivery = delivery; }
|
run() 里面的代码也比较长,不过逻辑上也很清晰,依然是一个死循环,不断地从网络队列中获取请求。
@Override public void run() { Process.setThreadPriority(Process.THREAD_PRIORITY_BACKGROUND); while (true) { long startTimeMs = SystemClock.elapsedRealtime(); Request<?> request; try { request = mQueue.take(); } catch (InterruptedException e) { if (mQuit) { return; } continue; } try { request.addMarker("network-queue-take"); if (request.isCanceled()) { request.finish("network-discard-cancelled"); continue; } addTrafficStatsTag(request); NetworkResponse networkResponse = mNetwork.performRequest(request); request.addMarker("network-http-complete"); if (networkResponse.notModified && request.hasHadResponseDelivered()) { request.finish("not-modified"); continue; } Response<?> response = request.parseNetworkResponse(networkResponse); request.addMarker("network-parse-complete"); if (request.shouldCache() && response.cacheEntry != null) { mCache.put(request.getCacheKey(), response.cacheEntry); request.addMarker("network-cache-written"); } request.markDelivered(); mDelivery.postResponse(request, response); } catch (VolleyError volleyError) { volleyError.setNetworkTimeMs(SystemClock.elapsedRealtime() - startTimeMs); parseAndDeliverNetworkError(request, volleyError); } catch (Exception e) { VolleyLog.e(e, "Unhandled exception %s", e.toString()); VolleyError volleyError = new VolleyError(e); volleyError.setNetworkTimeMs(SystemClock.elapsedRealtime() - startTimeMs); mDelivery.postError(request, volleyError); } } }
|
分发响应数据
请求处理完了,返回的数据应该怎么返回呢?在上面的代码中通过这个方法 mDelivery.postResponse(request, response) 来发送数据
@Override public void postResponse(Request<?> request, Response<?> response) { postResponse(request, response, null); }
|
@Override public void postResponse(Request<?> request, Response<?> response, Runnable runnable) { request.markDelivered(); request.addMarker("post-response"); mResponsePoster.execute(new ResponseDeliveryRunnable(request, response, runnable)); }
|
还记得之前构造请求队列的时候初始化了这货,handler 是跟主线程 looper 绑定的
public ExecutorDelivery(final Handler handler) { mResponsePoster = new Executor() { @Override public void execute(Runnable command) { handler.post(command); } }; }
|
这里的 command 就是上面代码中的 ResponseDeliveryRunnable ,点进去瞧一眼实现了 Runnable 接口,到这里还判断了一次是否被取消了。这段代码没什么好说的
public void run() { if (mRequest.isCanceled()) { mRequest.finish("canceled-at-delivery"); return; } if (mResponse.isSuccess()) { mRequest.deliverResponse(mResponse.result); } else { mRequest.deliverError(mResponse.error); } if (mResponse.intermediate) { mRequest.addMarker("intermediate-response"); } else { mRequest.finish("done"); } if (mRunnable != null) { mRunnable.run(); } }
|
mRequest.deliverResponse(mResponse.result),这是 Request 中的一个抽象方法,在子类中被实现,挑一个 JsonReqeust 实现的随意感受下,是不是就明白了。
@Override protected void deliverResponse(T response) { mListener.onResponse(response); }
|
请求完成及取消
数据是分发完了,别忘了请求还在各种乱七八糟的集合里面,得处理一下。先来看 request.finish() 方法,下面的代码只贴了核心代码,另外一部分跟 log 相关的没有贴出
void finish(final String tag) { if (mRequestQueue != null) { mRequestQueue.finish(this); } }
|
调用的是请求队列里的 finish()
<T> void finish(Request<T> request) { synchronized (mCurrentRequests) { mCurrentRequests.remove(request); } synchronized (mFinishedListeners) { for (RequestFinishedListener<T> listener : mFinishedListeners) { listener.onRequestFinished(request); } } if (request.shouldCache()) { synchronized (mWaitingRequests) { String cacheKey = request.getCacheKey(); Queue<Request<?>> waitingRequests = mWaitingRequests.remove(cacheKey); if (waitingRequests != null) { if (VolleyLog.DEBUG) { VolleyLog.v("Releasing %d waiting requests for cacheKey=%s.", waitingRequests.size(), cacheKey); } mCacheQueue.addAll(waitingRequests); } } } }
|
finish() 干了三件事情
- 把这个请求从现有集合中移除掉,因为已经结束了
- 回调所有的监听
- 把暂存集合中的重复请求加入到缓存队列中
如果是取消呢?cancelAll 里面是怎么处理的,下面这个是我们常用的方法,传入一个tag,取消所有该tag的请求
public void cancelAll(final Object tag) { if (tag == null) { throw new IllegalArgumentException("Cannot cancelAll with a null tag"); } cancelAll(new RequestFilter() { @Override public boolean apply(Request<?> request) { return request.getTag() == tag; } }); }
|
创建一个 RequestFilter 过滤器,条件是 request 的 tag 与传入 tag 相同,然后依次调用 cancel(),还记得前面多处地方判断当前请求是否被 cancel ,是就直接调用 finish。
public void cancelAll(RequestFilter filter) { synchronized (mCurrentRequests) { for (Request<?> request : mCurrentRequests) { if (filter.apply(request)) { request.cancel(); } } } }
|
优先级
我们知道如果要给一个请求设置优先级,需要重写一个方法 getPriority,默认返回的是 NORMAL ,
public Priority getPriority() { return Priority.NORMAL; } public enum Priority { LOW, NORMAL, HIGH, IMMEDIATE }
|
那入队的时候是怎么判断优先级的呢?Volley 好像也没有处理啊。
Volley 确实没有处理,还记得一开头介绍两个队列的时候提了一嘴,优先阻塞队列 — PriorityBlockingQueue,这个类实现了 BlockingQueue 接口,首先是一个阻塞队列
public boolean add(E e) { return offer(e); } public boolean offer(E e) { if (e == null) throw new NullPointerException(); final ReentrantLock lock = this.lock; lock.lock(); int n, cap; Object[] array; while ((n = size) >= (cap = (array = queue).length)) tryGrow(array, cap); try { Comparator<? super E> cmp = comparator; if (cmp == null) siftUpComparable(n, e, array); else siftUpUsingComparator(n, e, array, cmp); size = n + 1; notEmpty.signal(); } finally { lock.unlock(); } return true; }
|
如果没有传入对比器,那么被存储的对象应该实现了 Comparable 接口,在这个方法里面会根据 compareTo 方法来比对两个元素的大小,决定放在队列的哪个位置
private static <T> void siftUpComparable(int k, T x, Object[] array) { Comparable<? super T> key = (Comparable<? super T>) x; while (k > 0) { int parent = (k - 1) >>> 1; Object e = array[parent]; if (key.compareTo((T) e) >= 0) break; array[k] = e; k = parent; } array[k] = key; }
|
Request 正是实现了 Comparable 接口,并且按照优先级重写了 compareTo 方法
@Override public int compareTo(Request<T> other) { Priority left = this.getPriority(); Priority right = other.getPriority(); return left == right ? this.mSequence - other.mSequence : right.ordinal() - left.ordinal(); }
|
NetWork 网络传输
Volley 默认是使用 BasicNetWork(HttpStack) 来做网络传输,重写了 performRequest 这个方法,在这个方法里面调用 HttpStack 的 performRequest 方法。
httpResponse = mHttpStack.performRequest(request, headers);
|
贴出了 HurlStack 的代码,可以看到实际上就是使用的 HttpUrlConnection, 而且我猜 Hurl 是简称吧~
@Override public HttpResponse performRequest(Request<?> request, Map<String, String> additionalHeaders) throws IOException, AuthFailureError { String url = request.getUrl(); HashMap<String, String> map = new HashMap<String, String>(); map.putAll(request.getHeaders()); map.putAll(additionalHeaders); if (mUrlRewriter != null) { String rewritten = mUrlRewriter.rewriteUrl(url); if (rewritten == null) { throw new IOException("URL blocked by rewriter: " + url); } url = rewritten; } URL parsedUrl = new URL(url); HttpURLConnection connection = openConnection(parsedUrl, request); for (String headerName : map.keySet()) { connection.addRequestProperty(headerName, map.get(headerName)); } setConnectionParametersForRequest(connection, request); ProtocolVersion protocolVersion = new ProtocolVersion("HTTP", 1, 1); int responseCode = connection.getResponseCode(); if (responseCode == -1) { throw new IOException("Could not retrieve response code from HttpUrlConnection."); } StatusLine responseStatus = new BasicStatusLine(protocolVersion, connection.getResponseCode(), connection.getResponseMessage()); BasicHttpResponse response = new BasicHttpResponse(responseStatus); if (hasResponseBody(request.getMethod(), responseStatus.getStatusCode())) { response.setEntity(entityFromConnection(connection)); } for (Entry<String, List<String>> header : connection.getHeaderFields().entrySet()) { if (header.getKey() != null) { Header h = new BasicHeader(header.getKey(), header.getValue().get(0)); response.addHeader(h); } } return response; }
|
这一节没什么可讲的,其实就是说明 Volley 其实理解为一个调度器可能更贴近于它的功能,如果你需要完全可以把网络传输进行自定义,把线程调度交给 Volley,这也是它灵活强大的地方。
结语
通过这么久的源码学习,我发现看源码是消除误区和误解的最佳办法。并且能学习到大牛的编码风格,设计思路等等。
下一篇学习笔记中,我将分析 Volley 中的 ImageLoader 以及 LruCache 这个两个类,看看在 Android 处理图片的相关技术。